Friday, December 29, 2017

Ubuntu 17.04 and 17.10 network wait on start up issue

systemctl disable systemd-networkd-wait-online.service
systemctl mask systemd-networkd-wait-online.service

After disabling service will still start. Need to mask it

Friday, December 15, 2017

Istanbul BFT

Istanbul BFT inherits from the original PBFT by using 3-phase consensus, 
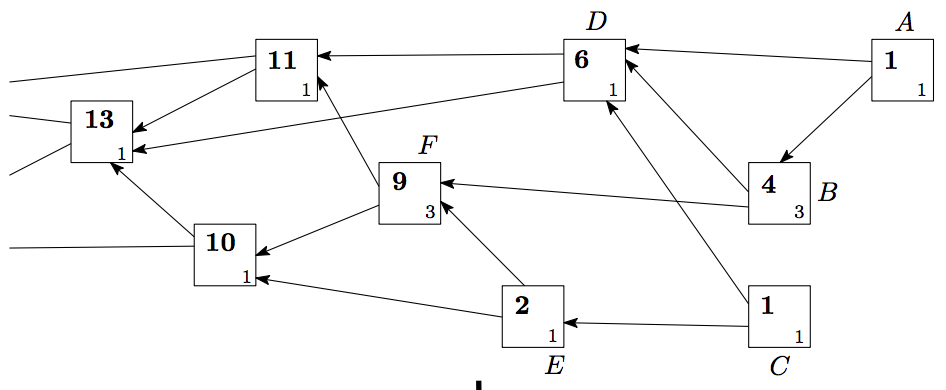
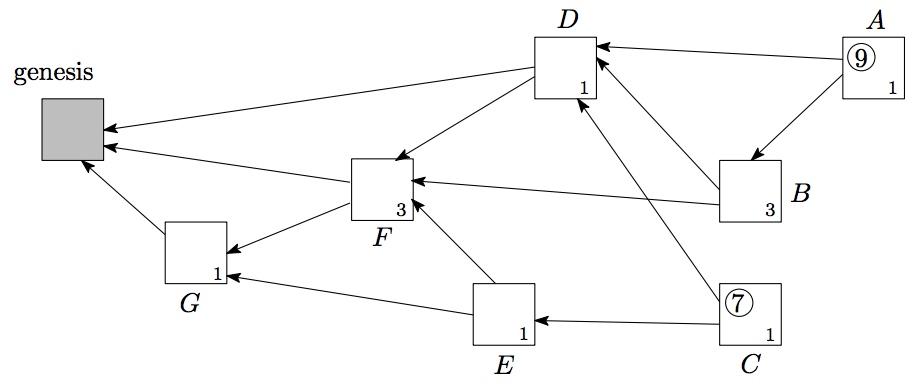
PRE-PREPARE, PREPARE, and COMMIT. The system can tolerate at most of F faulty nodes in a N validator nodes network, where N = 3F + 1. Before each round, the validators will pick one of them as the proposer, by default, in a round robin fashion.

The proposer will then propose a new block proposal and broadcast it along with the PRE-PREPARE message.

Upon receiving the PRE-PREPARE message from the proposer, validators enter the state of PRE-PREPARED and then broadcast PREPARE message. This step is to make sure all validators are working on the same sequence and the same round.

While receiving 2F + 1 of PREPARE messages, the validator enters the state of PREPARED and then broadcasts COMMIT message. This step is to inform its peers that it accepts the proposed block and is going to insert the block to the chain.

Lastly, validators wait for 2F + 1 of COMMIT messages to enter COMMITTED state and then insert the block to the chain.

https://raw.githubusercontent.com/getamis/files/master/images/istanbul_state_machine.jpg

Monday, December 11, 2017

DAG

Terms that matter

Weight (Own weight): The weight of transaction A is proportional to the effort put in by its issuer, which can be assumed to be 3^n.
Cumulative weight: Transaction A’s own weight + the sum of own weights of all the followed transactions that directly/indirectly approve transaction A. (E.g. In figure 4, transaction D has own weight as 1, and cumulative weight as 6 = D’s own weight + A’s own weight + B’ own weight + C’s own weight = 1 + 1 + 3 + 1.)


Figure 4: Weights (from IOTA white paper). Own weights at right-bottom. Cumulative weights at left-top, as bold.
Score: Transaction A’s own weight + the sum of own weights of all previous transactions approved by transaction A. (E.g. In figure 5, transaction A has score as 9 = A’s own weight + B’s own weight + D’s own weight + F’s own weight + G’s own weight = 1 + 3 + 1 + 3 + 1.)


Figure 5: Score (from IOTA white paper). Score at left-top, in the circle.


Height: The length of the longest oriented path to the genesis.
Depth: The length of the longest reverse-oriented oath to certain tips.
For instance, in figure 5, the height of D is 3 (D → F → G → genesis), and the depth of D is 2 (D ← B ← A).

Sunday, November 19, 2017

Turing, Turing Machine, Turing Alan Mathison

Turing, Alan Mathison |ˈt(y)o͝oriNG| (1912–54), English mathematician. He developed the concept of a theoretical computing machine and carried out important code-breaking work during World War II. He also investigated artificial intelligence.
Turing machinea mathematical model of a hypothetical computing machine that can use a predefined set of rules to determine a result from a set of input variables.Turing testa test for intelligence in a computer, requiring that a human being should be unable to distinguish the machine from another human being by using the replies to questions put to both.
In colloquial usage, the terms "Turing complete" or "Turing equivalent" are used to mean that any real-world general-purpose computer or computer language can approximately simulate the computational aspects of any other real-world general-purpose computer or computer language.
Real computers constructed so far are essentially similar to a single-tape Turing machine; thus the associated mathematics can apply by abstracting their operation far enough. However, real computers have limited physical resources, so they are only linear bounded automaton complete. In contrast, a universal computer is defined as a device with a Turing complete instruction set, infinite memory, and infinite available time.

In computability theory, several closely related terms are used to describe the computational power of a computational system (such as an abstract machine or programming language):
Turing completeness
A computational system that can compute every Turing-computable function is called Turing-complete (or Turing-powerful). Alternatively, such a system is one that can simulate a universal Turing machine.
Turing equivalence
A Turing-complete system is called Turing equivalent if every function it can compute is also Turing computable; i.e., it computes precisely the same class of functions as do Turing machines. Alternatively, a Turing-equivalent system is one that can simulate, and be simulated by, a universal Turing machine. (All known Turing-complete systems are Turing equivalent, which adds support to the Church–Turing thesis.)
(Computational) universality
A system is called universal with respect to a class of systems if it can compute every function computable by systems in that class (or can simulate each of those systems). Typically, the term universality is tacitly used with respect to a Turing-complete class of systems. The term "weakly universal" is sometimes used to distinguish a system (e.g. a cellular automaton) whose universality is achieved only by modifying the standard definition of Turing machine so as to include input streams with infinitely many 1s.


Friday, November 17, 2017

get zookeeper stable version from its distribution web site

Run the following command at one line:
zkver=$(curl http://www.apache.org/dist/zookeeper/stable/
|grep -o 'zookeeper-[0-9].[0-9].[0-9][0-9].tar.gz'
|(head -n1 && tail -n1)|sed 's/.tar.gz//')
The results:
echo $zkver
zookeeper-3.4.10

Wednesday, November 8, 2017

How to test if a port is open and running

For the port which are not secured, do the following:

telnet www.somesite 80
GET /index.html HTTP/1.1
Host: www.somesite
  
For the ports which are secured, do the following:
 
openssl s_client -connect www.somesite:443 
For the server uses self-signed certificate and secured port, do the following:
 
openssl s_client -connect 12.34.56.78:443 -servername www.somesite
The servername should be the server name specified in the TLS certificate

Wednesday, November 1, 2017

Friday, September 22, 2017

Change LiteIDE file type tab spacing

LiteIDE is a nice IDE for developing golang program, but there is one thing which made me cringing. The tab is most default to 4 spaces, but in some situation, you do not want it to be 4 spaces, but 2. To change that, you will need to find this file liteeditor.xml from this directory /Applications/LiteIDE.app/Contents/Resources/liteapp/mimetype, then make changes to that file to add your new type for example jinja2 template file. You can simply add the extention like *.j2 to one of the existing entries just like this one:

<glob pattern="*.j2"/>

Then you can open up LiteIDE and change the tab space to 2 or whatever number you desire.

Tuesday, September 19, 2017

Only get git repository file without any git metadata

1. Do a git pull to get latest from the repo
2. Run the following command to get the latest code into /var/tmp/junk directory

git archive --format=tar --prefix=junk/ HEAD | (cd /var/tmp/ && tar xf -)

Tuesday, August 1, 2017

How to use pep8 to check trailing white spaces in files

Install pep8
sudo pip install pep8
Then run the following command
pep8 --select=W291,W293 --filename=*.yml *
The above command will check trailing white spaces and lines with only white spaces in the files ending with .yml in the current and sub directories.

Sunday, July 30, 2017

How to start up openldap container and test it.

Start up the openldap containe
docker run --name ldap --hostname ldap.fabric-ca 
  -e LDAP_ORGANISATION="Fabric CA"
  -e LDAP_DOMAIN="fabric-ca"
  -e LDAP_ADMIN_PASSWORD="ps" -d osixia/openldap:1.1.9
The above procedure will enable tls and create server certificate and private, they can be found inside the container at this location:
/container/service/slapd/assets/certs
In the above directory, you can see ldap.crt and ldap.key file. Regardless what hostname or cn you might choose, the container seems will always use the name ldap.crt and ldap.key as the certificate name and key. There will be also ca.crt, but that certificate actually links to following directory which comes with the container.
/container/service/:ssl-tools/assets/default-ca 
Test the container
docker exec ldap ldapsearch -x -H ldap://localhost
  -b dc=fabric-ca -D "cn=admin,dc=fabric-ca" -w ps

Thursday, July 20, 2017

How to check if zookeeper and kafka are running correctly


Check on zookeeper:
telnet ipaddress port
stats
For example:
telnet 172.16.21.3 2181
Trying 172.16.21.3...
Connected to 172.16.21.3.
Escape character is '^]'.
stats
Zookeeper version: 3.4.9-1757313, built on 08/23/2016 06:50 GMT
Clients:
 /172.16.21.4:58476[1](queued=0,recved=321,sent=327)
 /172.16.38.0:55630[1](queued=0,recved=245,sent=245)
 /172.16.39.0:38124[1](queued=0,recved=240,sent=240)
 /172.16.21.1:39190[0](queued=0,recved=1,sent=0)

Latency min/avg/max: 0/0/14
Received: 807
Sent: 812
Connections: 4
Outstanding: 0
Zxid: 0x100000033
Mode: leader
Node count: 31
Connection closed by foreign host.


To check if the kafka nodes actually all registered, do the following:
1. docker exec -it zookeeper1st bash
2. cd /zookeeper-3.4.9/bin/zkCli.sh  ls /brokers/ids

WatchedEvent state:SyncConnected type:None path:null
[1, 2, 3]
or
1. docker exec -it kafka3rd bash
2. ./kafka-topics.sh --list --zookeeper zookeeper1st:2181
3. ./kafka-topics.sh --describe --zookeeper zookeeper1st:2181

Wednesday, July 19, 2017

Some thing about orderer joining the party

tongli 11:28 PM
@jimthematrix so there is no way at all to add a user or an orderer or a peer?

jimthematrix 11:31 PM  
@tongli not with the cryptogen tool right now. but you can use the resulting ca certs and key to initialize a fabric-ca server to issue additional certs for user/orderer/peer identities, or use a tool like openssl to do the same
@CarlXK 对的,想支持扩展就需要这么做

tongli 11:35 PM
@jimthematrix right, I guess the missing pieces are after ca got your what needed, how do you make a new peer joining in an existing channel? can we do that? and how do you make an orderer join?

jimthematrix 11:52 PM
adding a new peer of an existing org to a channel is pretty straightforward: you get the latest channel config from the orderer and send that to the peer. this doesn't require modifying the channel. If you want to add a whole new org to the channel, then you first have to follow a process to update the channel config with the orderer, then send the updated channel config to the new peers of the new org
i actually don't know what is involved in adding new orderers to an existing network. it's a some combination of starting the new orderer node with the genesis block, and updating the consortium definition in the system channel. for details you'd have to ask @jyellick

jyellick 11:59 PM
> you get the latest channel config from the orderer and send that to the peer.
This actually isn't true. The peer only supports joining through the genesis block.

jyellick 12:01 AM
> i actually don't know what is involved in adding new orderers to an existing network.
Generally, simply start the orderer with the same genesis block that the other orderers were started with. The orderer will catch up from the Kafka broker logs. Then, once the orderer is up to date, second a reconfiguration transaction on any channels you wish to use the new orderer updating the set of orderer addresses.

chenxuan 5:07 AM
@baohua peer 节点的/etc/hyperledger/fabric是怎么制定的

baohua 8:23 AM
哦 可以通过配置指定:$FABRIC_CFG_PATH

chenxuan 8:41 AM
当我执行make docker的时候 我看到里面的里面指定了
FABRIC_CFG_PATH 是不是这个环境变量打包到了镜像当中去


baohua 9:35 AM
if in dockerfile, then it is.

tongli 1:21 PM
@jyellick thanks for your explanation on how the orderer joining the party. That actually makes a lot of sense to me.
👍 1 
@jyellick jason, what if the orderer comes from different org which was never part of the genesis block when it was created?
When genesis block gets created, it uses Orderer profile , I assumed that takes in the organizations which orderers belong to.
when a new orderer from a new org wants to jump in, the genesis block would not have any idea about the new org, right?

jyellick 1:39 PM
For now, you would still bootstrap the new orderer with the old genesis block. And the new orderer would play the chain forward until it got to the current state.
This approach has many drawbacks, and it is a planned feature in the future to allow the orderer to be bootstrapped from a later config block (and to generally allow data pruning)
But for v1, the only option is to start with the true genesis block.
As an alternative, you may copy the ledger from an already current orderer, and use that as the seed for a new orderer, this might be preferable in some devops scenarios.

tongli 1:59 PM
@jyellick thanks, but I do not think I am clear on how the authentication is done for the new orderer, I mean how does everybody in the party already know this new guy and consider the new orderer legit? I mean how is the authentication done? or it does not really matter?

jyellick 2:02 PM
The Kafka orderers do not speak directly to eachother. They only interact via Kafka. So, if Kafka authorizes the new orderer (generally because of TLS), then this new orderer will be able to participate in ordering. Peers also authenticate via TLS, but additionally, when receiving a block, they verify that it has been signed by one of the ordering orgs per the BlockValidation policy. By default, this policy allows anyone from the ordering orgs to sign the blocks. Adding a new orderer org would extend this policy to allow this new org to sign blocks.

tongli 2:04 PM
Excellent. Thanks so much!

Wednesday, June 21, 2017

Fabric certificates

Each organization needs the following components:

1. ca
2. msp
3. orderers or peers
4. users

        The ca needs to have:
              1. private key
              2. certificate

        The msp needs:
              1. admin certificate
              2. the sign cert is the same as the CA certificate

        Each user needs: msp and tls
            for msp:
              1. keystore private key
            for tls
              2. tls server.key - need to generate
              3. tls server.crt - need to sign with CA certificate

        Each peer needs: msp and tls
            for msp:
              1.  keystore private key - need to generate
              2.  sign certificate - need to generate with ca certificate
            for tls:
              1. tls server.key - need to generate
              2. tls server.crt - need to generate with ca certificate

        Each orderer needs: msp and tls
            for msp:
              1. keystore private key - need to generate
              2. sign certificate - need to generate with the ca sign certificate
            for tls:
              1. tls server.key - need to generate
              2. tls server.crt - need to sign with the ca certificate

The process to create all the certificates
1. Create CA private key and certificate
2. Create a private key as the admin user keystore key, then use CA certificate sign the private key
   to create the admin certificate
3. For either orderer or peer, create a private key as the msp keystore private key, then use CA
   certificate sign the private key to create the peer or orderer certificate
4. Regardless it is a user or peer or orderer, each will need tls keys. Create a private key, then use
   CA certificate sign the private key to create the user, peer or orderer sign certificate.

Looks like fabric uses pkcs8 format rather than the traditional ec format, so use the following command to convert.

openssl pkcs8 -topk8 -nocrypt -in tradfile.pem -out p8file.pem
 
 
Here is an example. 
 
 
1. Generate a CA private key
 
  openssl ecparam -genkey -name prime256v1 -noout -out ca.key
 
2. Convert that key to pkcs8 format (Do not have to do this)
 
  openssl pkcs8 -topk8 -nocrypt -in ca.key -out ca.sk
 
3. Create certificate for CA

openssl req -x509 -new -SHA256 -nodes -key ca.sk -days 1000
   -out ca.crt -subj "/C=US/ST=NC/L=Cary/O=orga/CN=ca.orga" 
 
4. Generate a private key for a server or user and convert to pkcs8 format
 
  openssl ecparam -genkey -name prime256v1 -noout -out server.key
  openssl pkcs8 -topk8 -nocrypt -in server.key -out server.sk (optional)
 
5. Create a certificate signing request (CSR)

  openssl req -new -SHA256 -key server.sk -nodes -out server.csr
    -subj "/C=US/ST=NC/L=Cary/O=orga/CN=peer1.orga"  
 
6. Once generated, you can view the full details of the CSR:

   openssl req -in server.csr -noout -text 
 
7. Now sign the certificate using the CA keys:
 
   openssl x509 -req -SHA256 -days 1000 -in server.csr -CA ca.crt
    -CAkey ca.sk -CAcreateserial -out server.crt 

Friday, June 16, 2017

Change Ubuntu machine search domain

 For ubuntu 16.04, add the following to file /etc/resolvconf/resolv.conf.d/base

search xxxxx

where xxxxx is the search domain to be added to resolv.conf.

After make that change, you will need to restart the networking services.

systemctl restart networking


The following procedure does not work for ubuntu 16.04.
You will need to edit this file with your favorite editor:
 
sudo nano /etc/dhcp/dhclient.conf

Once in file, you should see a commented line with the word supersede next to it:
#supersede domain-name "...."
Uncomment that line, substitute the name supersede for append, then add the domain names you wish to search (follow the example below and leave a space after the first "):
append domain-name " ubuntu.com ubuntu.net test.ubunut.com";
 
If you just want to use complete different search domain, then just leave the
word supersede, only replace the domain names.
 
supersede domain-name " fabric.com whatever.io" 

Monday, June 12, 2017

Creating Self-Signed ECDSA SSL Certificate using OpenSSL (Copy from another post)

Before generating a private key, you’ll need to decide which elliptic curve to use. To list the supported curves run:

openssl ecparam -list_curves

The list is quite long and unless you know what you’re doing you’ll be better off choosing one of the sect* or secp*. For this tutorial I choose secp521r1 (a curve over 521bit prime).
Generating the certificate is done in two steps: 1. Create the private key,
openssl ecparam -name secp521r1 -genkey \
  -param_enc explicit -out private-key.pem
2. Create the self-signed X509 certificate:
openssl req -new -x509 -key private-key.pem \
  -out server.pem -days 730
The newly created server.pem and private-key.pem are the certificate and the private key, respectively. The -param_enc explicit tells openssl to embed the full parameters of the curve in the key, as opposed to just its name. This allows clients that are not aware of the specific curve name to work with it, at the cost of slightly increasing the size of the key (and the certificate).

You can examine the key and the certificate using
openssl ecparam -in private-key.pem -text -noout
openssl x509 -in server.pem -text -noout
Most webservers expect the private-key to be chained to the certificate in the same file. So run:
cat private-key.pem server.pem > server-private.pem
And install server-private.pem as your certificate. If you don’t concatenate the private key to the certificate, at least Lighttpd will complain with the following error:
SSL: Private key does not match
the certificate public key, reason: error:0906D06C:PEM
routines:PEM_read_bio:no start line

Thursday, June 1, 2017

How to install Gerrit

1. Install java jdk or Oracle java if you do not have it already
apt install openjdk-8-jre-headless
2. Create directories named review
mkdir -p ~/review
3. Download gerrit.war here, assume the war you are getting is gerrit-2.14.6.war
wget https://www.gerritcodereview.com/download/gerrit-2.14.6.war
4. Run the following command from where gerrit war file is:
java -jar gerrit-2.14.6.war init -d ~/review

During this process, you can use most of the default values. For authentication, if this is for development, you can use this value DEVELOPMENT_BECOME_ANY_ACCOUNT. Otherwise, choose apropriate means such as OpenID or LDAP etc. To trigger the jenkins build, there is no need to install events-log plugin unless you like jenkins to handle missed events.

5. Set up gerrit services
Execute the following commands to copy gerrit service file to the /lib/systemd/system directory:
sudo cp ~/review/bin/gerrit.service /lib/systemd/system
Edit /lib/systemd/system/gerrit.service file. Make sure that the StandardInput=socket is REMOVED:
# StandardInput=socket
 Without removing the above line, the service will wait for a socket which we do not really need.

Make sure WorkingDirectory and Environment set to the right values for GERRIT_HOME and JAVA_HOME in [Service] section. For the examples above, the two lines should look like the following:
Environment=GERRIT_HOME=/home/ubuntu/review
Environment=JAVA_HOME=/usr/lib/jvm/java-8-oracle/jre
ExecStart=/usr/bin/java -Xmx1024m -jar \
  ${GERRIT_HOME}/bin/gerrit.war daemon -d ${GERRIT_HOME}
6. Start the gerrit services
sudo systemctl start gerrit.service 

To allow remote administration, add the following to the etc/gerrit.config file, then restart the service
[plugins]
        allowRemoteAdmin = true
The events-log.jar download location: https://gerrit-ci.gerritforge.com/job/plugin-events-log-bazel-stable-2.14/lastSuccessfulBuild/artifact/bazel-genfiles/plugins/events-log/events-log.jar git-review may need to do this
git remote rename origin gerrit
If you like to use an existing gerrit.config file, save the following content in the review/etc/gerrit.config file, then run the java command.
[gerrit]
 basePath = git
 serverId = edb71efd-32fe-48ae-a18b-b287e9f825a5
 canonicalWebUrl = http://192.168.56.30:9090/
[database]
 type = h2
 database = /home/ubuntu/review/db/ReviewDB [index]
 type = LUCENE
[auth]
 type = DEVELOPMENT_BECOME_ANY_ACCOUNT
[plugins]
        allowRemoteAdmin = true
[receive]
 enableSignedPush = false
[sendemail]
 smtpServer = localhost
[container]
 user = ubuntu
 javaHome = /usr/lib/jvm/java-8-oracle/jre
[sshd]
 listenAddress = *:29418
[httpd]
 listenUrl = http://*:9090/
[cache]
 directory = cache

How does gerrit trigger work on Jenkins

The gerrit trigger works like this:
  1. It connects to the gerrit server using ssh and uses the gerrit stream-events command
  2. It then watches this stream as the data comes in
  3. It will try to match the events to triggers that have defined in your projects
Common issues:
  1. Jenkins user has improper ssh credentials
  2. Jenkins user does not have the stream-events rights
  3. The user public key was not added to gerrit
How to check:
  1. Login as jenkins user, assume username is admin
  2. ssh -p 29418 admin@gerrit_server gerrit stream-events
  3. Push a commit to the server and you should see things on your stream
Problems:
  1. ssh connection failed? setup you ssh key pair
  2. No streaming right? Go to the All-Projects->Access and under Global Capabilities add Stream Events to the Non-Interactive Users group

Gerrit access rights

  1. Create the profile through in Gerrit web interface for your Jenkins user, and set up a SSH key for that user.
  2. Gerrit web interface > Admin > Groups > Non-Interactive Users > Add your jenkins user.
  3. Admin > Projects > ... > Access > Edit
    • Reference: refs/*
      • Read: ALLOW for Non-Interactive Users
    • Reference: refs/heads/*
      • Label Code-Review: -1, +1 for Non-Interactive Users
      • Label Verified: -1, +1 for Non-Interactive Users
IMPORTANT: On Gerrit 2.7+, you also need to grant "Stream Events" capability. Without this, the plugin will not work, will try to connect to Gerrit repeatedly, and will eventually cause OutOfMemoryError on Gerrit.
  1. Gerrit web interface > People > Create New Group : "Event Streaming Users". Add your jenkins user.
  2. Admin > Projects > All-Projects > Access > Edit
    • Global Capabilities
      • Stream Events: ALLOW for Event Streaming Users

Wednesday, May 31, 2017

gopath, goroot and path

I got quite confused about gopath, path and goroot when I started working on a project based on golang. Here is how I setup the environment

In ~/.profile, assume that golang was installed at /usr/local/go, your own project is at /home/ubuntu/hl, add the following

export GOPATH="/home/ubuntu/hl"
export GOROOT="/usr/local/go"
PATH="$GOROOT/bin:$GOPATH/bin:$PATH"

Monday, May 29, 2017

Disable Ubuntu automatic periodic updates


Change /etc/apt/apt.conf.d/10periodic and make that value to be 0 like below
APT::Periodic::Update-Package-Lists "0";
Then disable the following services:
systemctl disable apt-daily.timer
systemctl disable apt-daily.service

make ssh-agent run automatically

1. Start up the agent by adding the following in .profile, assume key file is called interop:

if [ -z "$SSH_AUTH_SOCK" ] ; then
  eval `ssh-agent -s`
  ssh-add ~/.ssh/interop
fi
2. Kill the agent when log out by adding the following in .bash_logout:
trap 'test -n "$SSH_AGENT_PID" && eval `/usr/bin/ssh-agent -k`' 0

Friday, May 26, 2017

what does g stand for in gRPC?


Each version of gRPC gets a new description of what the 'g' stands for, since we've never really been able to figure it out.
Below is a list of already-used definitions (that should not be repeated in the future), and the corresponding version numbers that used them:
1.0 'g' stands for 'gRPC'
1.1 'g' stands for 'good'
1.2 'g' stands for 'green'
1.3 'g' stands for 'gentle'
1.4 'g' stands for 'gregarious'

Wednesday, May 24, 2017

show git last commit changed files


The following command shows last commit changed files:

aa=$(git diff-tree --no-commit-id --name-only -r $(git log -2 --pretty=format:"%h") | sed 's%/[^/]*$%/%'| sort -u | awk '{print "github.com/hyperledger/fabric/"$1"..."}' | grep -v gitignore | while read kkk; do go list $kkk; done | sort -u)

git diff-tree --no-commit-id --name-only -r $(git log -2 --pretty=format:"%h")

Tuesday, May 23, 2017

Docker Docker Docker

Some useful docker commands:

Install docker
sudo apt-get install docker.io
Remove all docker images
docker rmi $(docker images -a -q)
Remove all exited containers and dangling images
docker rm $(docker ps -a -f status=exited -q)
docker rmi -f $(docker images -f "dangling=true" -q)
Stop all running containers
docker stop $(docker ps -a -q)
Connect to a running container
docker exec -it ContaineridOrName bash
Run a docker container and interact with the container
docker run -it --rm busybox
Normally a regular user can not run docker because of the permissions, the following command assume that a use group named "docker" has been created during the docker install, then you can the following command to add the current logged in user to the docker group, then refresh the group, the current user will be able to manipulate docker as the root user:
sudo gpasswd -a $USER docker
newgrp docker 
sudo chmod 666 /var/run/docker.sock 


Friday, May 19, 2017

how to build hyperledger fabric on Ubuntu

Here is the process to setup environment on ubuntu 16.04 to build Hyperledger fabric:

Highlight of the process
  • Install tools and dependencies such as git, pip, docker-composer, dev libraries etc.
  • Go - 1.7 or later (for releases before v1.0, 1.6 or later)
  • Docker - 1.12 or later
  • Docker Compose - 1.8.1 or later
  • Setup environment and extract hyperledger fabric code
  • Run the build
1.Install some dependencies first:
sudo apt-get update
sudo apt-get -y install python-dev python-pip libtool libltdl-dev
sudo pip install --upgrade pip
sudo pip install behave nose docker-compose protobuf couchdb==1.0
2.Install golang 1.7 or later from https://golang.org/doc/install by first download a version matching your environment, then run the command below:
tar -C /usr/local -xzf go1.8.1.linux-amd64.tar.gz

Do not forget adding the path to your PATH env.

PATH="/usr/local/go/bin:$PATH"
3.Install docker engine:
sudo apt-get install docker.io
4.Create a working directory and setup GOPATH:
mkdir -p ~/gopath/src/github.com/hyperledger
export GOPATH=~/gopath
5.Extract the source code to direct created in step 4:
git clone http://gerrit.hyperledger.org/r/fabric 
6.Build fabric binaries:
cd $GOPATH/src/github.com/hyperledger

make dist-clean all

or make individual target like this:

make peer

Wednesday, May 17, 2017

Getting Behave working on Ubuntu

Run the following commands to install behave on ubuntu:
sudo apt-get update
sudo apt-get install python-dev python-pip
sudo pip install --upgrade pip 
sudo pip install behave

Tuesday, May 16, 2017

How to install Jenkins on Ubuntu

Before you start, please make sure that you have java installed. If you do not have java already, please refer this link to install. http://idroot.net/linux/install-oracle-java-ubuntu-17-10/

1. First add the key to your system:
wget -q -O - https://pkg.jenkins.io/debian/jenkins.io.key \
| sudo apt-key add - 
2. Then add the following entry in your /etc/apt/sources.list:
deb https://pkg.jenkins.io/debian binary/
3. Run the following two commands to install Jenkins:
sudo apt-get update
sudo apt-get install jenkins
4. If no errors during the above steps, you can find the generated admin password here:
/var/lib/jenkins/secrets/initialAdminPassword
5. Point a browser to the following URL and use the admin password found in step 4 to config Jenkins:
http://<<IP_Address_of_server>>:8080
6. Select some plugins to install from the Jenkins dashboard.
7. Create first admin username and password from the Jenkins dashboard.

Wednesday, April 12, 2017

Use openssl to create certificates

openssl can be use to manually generate certificates for your cluster.

1. Generate a key "ca.key" using 2048 bits:
openssl genrsa -out ca.key 2048

2. Use the ca.key to generate a certificate "ca.crt" (use -days to set the certificate effective time):
openssl req -x509 -new -nodes -key ca.key \
    -subj "/CN=${MASTER_IP}" -days 1000 -out ca.crt

3. Generate a key "server.key" using 2048 bits, same as generate ca key:
 openssl genrsa -out server.key 2048
4. Use the server.key to generate a Certificate Signing Request "server.csr":
openssl req -new -key server.key -subj "/CN=${MASTER_IP}" \
    -out server.csr

5.Use the CA key "ca.key", certificate "ca.crt" and a server CSR "server.csr" to generate a certificate "server.crt":
openssl x509 -req -in server.csr -CA ca.crt -CAkey ca.key \
    -CAcreateserial -out server.crt -days 10000

6. View the certificate.
openssl x509  -noout -text -in ./server.crt 


The above procedure uses openssl generate the ca certificate, and a server certificate that the ca will be able to validate since the server certificate was generated by using the CA certificate.

csr file - certificate signing request file. It is a message sent from an applicant to a Certificate Authority in order to apply for a digital identity certificate.
crt file - certificate file,  crt files are used to verify a secure website's authenticity, distributed by certificate authority (CA) companies such as GlobalSign, VeriSign and Thawte.
A certificate contains a public key.

The certificate, in addition to the public key, contains additional information, such as issuer, what it's supposed to be used for, and any other type of metadata.

Typically a certificate is itself signed with a private key, that verifies its authenticity.

Sunday, February 26, 2017

All about containers

Here is the command to create a docker container by using google container image.

  docker run --rm gcr.io/google-containers/busybox
 
Use docker to run an interactive container from gcr

  docker run -i -t gcr.io/google-containers/busybox 
 
Use kubectl to run an interactive container from gcr 
 
  kubectl run -i -t tongbusy --image=gcr.io/google-containers/busybox
 
Attach to a running container in a pod.
 
  kubectl attach tongbusy-400598208-v0jpg -c tongbusy -i -t 
 
 
Install pypy to coreos
 
  wget https://bitbucket.org/squeaky/portable-pypy/downloads/pypy-5.6-linux_x86_64-portable.tar.bz2
   
  tar xf pypy-5.6-linux_x86_64-portable.tar.bz2 
 
Check coreos releases:
 
  cat /etc/os-release
  

Inspect log files of systemd server

journalctl -u [unitfile]
 
for example, for a service named kube-apiserver, you should do the following:
 
   sudo journalctl -u kube-apiserver
 
 
Other kubernetes services checking log files:
 
sudo journalctl -u kube-controller-manager
sudo journalctl -u kube-scheduler
sudo journalctl -u kubelet
sudo journalctl -u kube-proxy    
 

Thursday, February 2, 2017

Get various networking related parameters by using basic bash command

vifcidr=$(ip -4 -o addr | grep -v '127.0.0.1' | awk '{print $4}’)
Find the cidr

vifbrd=$(ip -4 -o addr | grep -v '127.0.0.1' | awk '{print $6}’)
Find the broadcast address

vifmtu=$(ip -4 -o link | grep -v 'LOOPBACK' | awk '{print $5}’)
Find MTU

vifip=$(echo $vifcidr | awk -F '/' '{print $1 }')
Find IP address based on the cidr found above

vifname=$(ip -4 -o addr | grep -v '127.0.0.1' | awk '{print $2}')
Find the non-loopback interface card

defaultgw=$(ip route | awk '/default / {print $3}')
Find the default gateway ip address

Tuesday, January 3, 2017

Setup ansible environment with specific version on Ubuntu


sudo apt-get update
sudo apt-get install python-dev python-pip libssl-dev libffi-dev -y
sudo pip install --upgrade pip

sudo pip install six==1.10.0
sudo pip install shade==1.16.0
sudo pip install ansible==2.2.1.0

The versions above shows the versions which were used by OpenStack Interop Challenge workload needed versions.